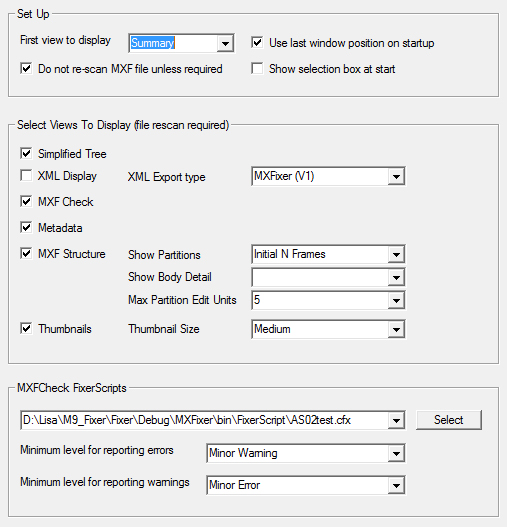
Interface Set Up preferences provide settings for controlling the user interface and file processing and display options.

Set Up:
First view to display selects the view that will be loaded up startup. Summary is the default view.
Check Use last window position on startup to set the location of the MXFixer application window. The center of the primary monitor is the default.
Check Do not rescan MXF file unless required to load the version already stored in the cache. This saves time but may not reflect changes if MXFixer is updated. Files are always scanned the first time they are opened
Check Show selection box at start to display a list of previously opened files.
Select Views To Display:
Tick the boxes to select the views required. Simplified Tree, XMLDisplay, MXF Check, Metadata, MXF Structure and Thumbnails. The Summary view is always created. Files will require rescanning to add or eliminate views
MXF Structure Parameters
In addition, a display of the partitions in the file can be added to the Structure View. In some files with a large number of partitions this can take a considerable time.
For large files, the MXFStruct test can take a long time to run and produce a lot of output. By default it does not show all the information in the file, but carefully selects enough information to show all likely defects in the file. For deeper examination select the 'show body details' option.
Thumbnail Parameters
Thumbnail size: Thumbnails may be created at several different sizes, select the option that best works with your screen, balancing the visibility of the image and the number of images on a screen
MXFCheck Scripts:
If a standard script is not selected then another script can be selected from here.
This selects the script that will control the MXF check tests. This enables fine control over which tests are suitable for your environment.
Error Levels
There are a range of different error levels
1.Minor Warning: A low level warning message (very picky warnings)
2.Warning: A warning message
3.Major Warning: A high level warning message (a serious warning that is nearly an error)
4.Slight Error: An error message (something is technically wrong, but the file will probably work perfectly)
5.Minor Error An error message (something is wrong, but the file is sound enough that it may still work (includes being asked to test something that is not there - even though not being there is valid) )
6.Error: An error message (an error that will probably prevent the file from working as expected)
7.Major Error: A high level error message (this file seems to be broken - or the test can't be run on this sort of file! (or the test parameters are wrong) )
8.Fatal Error: A fatal error message (indicates that the error is so serious that not only can this test not continue, but the file is totally broken (or the test is broken or mis-configured) )
9.Critical Error: A critical error message (indicates that the error is so bad that either the test engine is broken or the computer is malfunctioning!)
It is possible to set the level at which errors and warnings are counted
Minimum level for reporting errors:
This box sets the lowest level at which an error is reported and counted as as 'error', anything lower is reported as an warning or ignored.
Minimum level for reporting warnings:
This box sets the lowest level at which a warning is reported and counted as a warning. Anything lower is ignored